
I’m not going to pretend to be a Linux expert, I don’t even know if I would consider myself a novice to be honest with you, but I do enjoy figuring stuff out…sometimes. This week I had some fun trying to install VMware Tools on a SUSE Linux VM and didn’t realize how much fun I was about to have.
Basically, I did the following:
a. “Mounted” the VMTools ISO. The VM mounted the VMTools ISO using /media as the mount point.
b. changed to super user (su -)
c. changed to the /media directory and used tar to extract the VMware Tools installation files: tar -C /tmp -zxvf /tmp /media/VMware-Tools/VMwareTools-<YourVersion>.tar.gz (in Linux, you can use the Tab key to complete commands)
d. change to the /tmp/vmware-tools-distrib directory
e. execute ./vmware-install.pl -default to install VMware Tools with the default settings
 |
| Running VMware Tools with Default settings |
When executing with the default settings, the installation will run a second script vmware-config-tools.pl that is responsible for the configuration of VMware Tools. VMware Tools will not read as installed until the vmware-config-tools.pl script is completed. Anyway, when this ran, the script returned an “Execution Aborted” message stating, something the effect, “mkinitrd was unable to execute as a valid boot image could not be found”. I took a screenshot of it but can’t seem to find it now, but that will have to be close enough.
Now, before this week, I had never loaded SUSE Linux, nor did I load this VM. To troubleshoot the issue, I built a second SUSE so I could see the installation process, partition creation, etc. I created a couple ext3 partitions for swap and /, loaded SUSE and installed VMware Tools and it worked perfectly! I did not load the first box so I had no idea how the partitions were constructed but was told this VM was to be used for NetWare so it was loaded with a LVMs or EVMS….here too, I lost my screenshots to describe it exactly. So for some reason, VMware Tools installed just fine on one and not on the other. On the EVMS configured VM, the /boot partition was created outside the LVM, my understanding this is done the way you used to have to install DOS before install NetWare. The swap and the / partitions however, did reside in the LVM/EVMS.
I don’t know enough about SUSE and NetWare to know how to resolve the issue and decided to open a case with VMware for if anyone knew it would be them right. Working with my customer, we opened a case with VMware and while on hold, we decided to keep digging and Carl came upon the following:
Specifically, on our test VM, we walked through the steps under the After the Server Install section.
After the SUSE Linux Enterprise Server 10 install is complete, you must perform the following tasks to ensure that the system device functions properly under EVMS:
a. Edit the /etc/fstab File
b. Make a New initrd
c. Disable the boot.lvm and boot.md Services
d. Enable the boot.evms Service
e. Restart the Server
1. Edit the /etc/fstab File
When you boot the system, the kernel reads the /etc/fstab file to identify which file systems should be mounted and then mounts them. This file contains a table of file system information about the root (/), /boot, and swap partitions plus other partitions and file systems you want to mount.
The /boot partition is separate from the EVMS container where you placed the root (/) and swap partitions and is not managed by EVMS at this time. However, in the following steps, you disable boot.lvm and boot.md, then enable boot.evms. In effect, this forces EVMS to scan all the partitions at boot time, including the /boot partition, and it activates /boot under the /dev/evms directory. Therefore, this makes /boot a partition that is discovered by EVMS at startup, and requires that the device be listed under /dev/evms in the fstab file so it can be found when booting with boot.evms. You must edit the /etc/fstab file to modify the location of the /boot partition so it is under the /dev/evms directory.
Open the /etc/fstab file in a text editor.
Locate the line that contains the /boot partition.
In the Device Name column, modify the location of the /boot partition from /dev to /dev/evms so it can be managed by EVMS.
Save the file.

The changes do not take effect until the server is restarted. Do not restart at this time.
2. Continue with Make a New initrd.
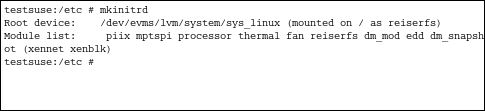
Open a terminal console, and log in as the root user.
At the console prompt, enter: mkinitrd
This creates a new initrd file with the correct settings for the boot device. The changes do not take effect until the server is restarted. Do not restart at this time.
3. Continue with Disable the boot.lvm and boot.md Services.
Disable the boot.lvm and boot.md Services
Disable the boot.lvm and boot.md services so they do not run at boot time (runlevel B). EVMS now handles the boot.
In YaST, click System > System Services (Runlevel) > Expert Mode.
Select boot.lvm.
Click Set/Reset > Disable the Service.
Select boot.md.
Click Set/Reset > Disable the Service.
Click Finish, then click Yes.

The changes do not take effect until the server is restarted. Do not restart at this time.
4. Continue with Enable the boot.evms Service.
Enable the boot.evms Service
The boot.evms service should be enabled automatically after the install, but you should verify that it is enabled.
In YaST, click System > System Services (Runlevel) > Expert Mode.
Select boot.evms.
Click Set/Reset > Enable the Service.
The B runlevel option is automatically selected.
Click Finish, then click Yes.
The changes do not take effect until the server is restarted.
5. Restart the Server.
Once the server is rebooted, go to the /usr/bin directory and rerun the vmware-config-tools.pl script and it should succeed as shown below:

