
I have increasingly seen customers turn to zero clients when deploying Citrix XenApp, XenDesktop, or VMware View. Personally, I have used the Samsung NC190 on VMware View deployments and the Wyse Xenith C00x zero clients on Citrix deployments and both have been easy to setup and manage. I like the Teridici Management Console for the PCoIP clients and Citrix XenDesktop includes a Wyse Xenith Manager but I have not worked with it much so I can’t offer an opinion. However, much, if not all, of the configuration of the Wyse Xenith can be done through DHCP and when combined with a customization file (xen.ini) stored on a web server, all that’s involved in delivering a Citrix desktop is to connect it the network and power it on.
In this post, I’ll go over the steps to configure the DHCP options to allow for an “instant-on” experience. In part 2, I’ll go over registering the IIS extensions.
Configuring the DHCP Server
The first step is configuring the DHCP server as the Xenith clients make use of DHCP options 161, 162, and 181. DHCP options 161 and 162 to implement the xen.ini file which enables you to automatically set the default configuration of all Wyse Xenith thin clients in your environment.
DHCP option 181 is used to specify the Citrix Web Interface URL which allows a network connected Wyse Xenith to automatically detect the location of the XenDesktop/XenApp server where a user can log on and access their desktop. Without an automatic detection set-up, an administrator must enter the address locally on the thin client using the Remote Connections dialog box.
1. Open the DHCP admin MMC, then right-click your DHCP server and select Set Predefined Options
2. On the Predefined Options and Values window, set the Option class to DHCP Standard Options and then click Add.
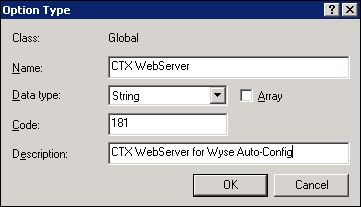
3. In the Option Type dialog box, enter the Name, Data Type (String), Code (181), and Description. Click OK.
4. When returned to the Predefined Options and Values screen, enter http://YOURCTXWEBINTERFACE for the String value and click OK.

5. Before adding options 161 and 162, copy the xen.ini file to a central location which the Wyse thin client have access. I have copied the file to my Citrix Web Interface server after creating a Wyse virtual directory with the path C:\inetpub\wwwroot\wyse. However, the xen.ini file was copied to C:\Inetpub\wwwroot\wyse\wnos as I believe, if memory serves, this is the default path for the Xenith clients.
6. Return to the Predefined Options and Values window, and verify the Option class to DHCP Standard Options and then click Add. In the Option Type dialog box, enter the Name, Data Type (String), Code (161), and Description. Click OK.

7. When returned to the Predefined Options and Values screen, enter http://YOURCTXWEBINTERFACE for the String value and click OK.

8. Create another option for 162. In the Option Type dialog box, enter the Name, Data Type (String), Code (162), and Description. Click OK.

9. When returned to the Predefined Options and Values screen, enter / for the String value and click OK.

10. Finally, enable these new options on a Scope or Server level as shown below:

That’s all for the DHCP Configuration, in the next post will look at setting the required MIME types on the default web site to ensure the Xenith clients can access the xen.ini file.

If possible, please elaborate on Step 5. Thank you in advance.
Step 5 is just my reminder to make sure I have copied the xen.ini customization file to a central web server so that DHCP options 161 and 162 will work.
You can customize many things in the xen.ini file. Here's an example I found on the Citrix forums:
;; Password protects Wyse's admin mode
AdminMode=yes \
Username=administrator \
Password=*****
;; Allow Firmware Upgrades but not Downgrades
AutoLoad=2
;;Disable showing the Domain
DisableDomain=Yes
;;Set Domain
DomainList=yourADdomainhere.com
;; Set ScreenSaver
ScreenSaver=30 \
Type=3 \
Image=customLogo.bmp
;; Disable ability of user to change anything
PRIVILEGE=None
;; Time Stuff
TimeZone=”GMT – 06:00″
TimeServer=time.nist.gov
;; Create Unique Xenith Password
VncPassword=*****
;; Set Custom Background
DeskTop=background.bmp \
Layout=Center
;; Map USB Drives to Z
SessionConfig=ALL \
mapdisks=yes
;; disable session reliability and keep map disk for USB Drives
SessionConfig=ICA \
SessionReliability=no \
mapdisksunderz=yes \
ProgressiveDisplay=yes
;; Tune to Low Bandwidth
LowBand=yes
;; Set idle logout
INACTIVE=480
Just from this you can see that the xen.ini can be used to enforce strict control of the Wyse zero clients. To get started with a sample xen.ini file, do the following:
1. From the file server machine on which you want to load the INI files for use, go to:
http://www.wyse.com/manuals.
2. On the Knowledge Base page, type sample.ini in the search box and click Go.
3. In the resulting solutions Title list, click the reference guide link for Wyse Xenith (for
example, Reference Guide – Wyse Xenith).
4. In the resulting attachments Name list, click the Sample INI link for the .exe file you
want (for example, Xenith_Sample_MAY2010.exe) to open and use the File
Download dialog box.
5. Rename the file to xen.ini when ready for use, and copy to your central location.
;; Password protects Wyse's admin mode
AdminMode=yes \
Username=administrator \
Password=*****
cannot get the device to authenticate to Admin Mode.My device reads the config, i can see the settings in the Global.ini on the device read from the xen.ini.
Any advice. thx
Do you actually need a stand alone web server for this?
This comment has been removed by the author.
Thanks for the information. Have you ever attempted to configure the DHCP Tags with StoreFront using SSL?
I'm finding that I can manually configure the two settings on the Xenith Pro and conenct to the StoreFront and Xen.ini file without issue, but when I enable and use Tag options 161, 162 and 181, the Xenith intially request acceptance of the cert, but the cofig fails and the Xentih event log shows that the configuration cannot be found.
My tags are:
161: https://FQNservername
162: /
181: https:///Citrix//PNAgent/config.xml
Xen.ini file:
autoload=1
Fileserver=https://
Rootpath=wyse
AdminMode=yes Username= Password=************
Privilege=None
EnableGKey=yes
;*************************************************************
;* General 3 *
;*************************************************************
AddCertificate=cert.pfx Password=*********
AddCertificate=Root.cer
AddCertificate=RootCA.cer
SysMode=vdi ToolbarEnableOneSession=yes
;*************************************************************
;* Peripherals *
;*************************************************************
Device=audio Volume=25 mic_vol=25
;*************************************************************
;* Display *
;*************************************************************
Desktop=BackgroundDefault24bit.bmp Layout=Stretch
Dualhead=yes
;*************************************************************
;* HDX/TCX *
;*************************************************************
Device=vusb ForceRedirect=0x046d,0x081b,0x00,0x02,0x01 Type=HDX
Device=vusb ForceRedirect=0x046d,0x081b,0x0e,0x03,0x00 Type=HDX
Device=vusb ForceRedirect=0x046d,0x081b,0x01,0x02,0x00 Type=HDX
Device=vusb ForceRedirect=0x046d,0xc016,0x03,0x01,0x02 Type=HDX
Device=vusb ForceRedirect=0x046d,0x0821,0x00,0x00,0x00 Type=HDX
Device=vusb ForceRedirect=0x046d,0x0821,0x0e,0x03,0x00 Type=HDX
Device=vusb ForceRedirect=0x046d,0x0821,0x01,0x02,0x00 Type=HDX
Device=vusb ForceRedirect=0x046d,0xc016,0x03,0x01,0x02 Type=HDX
;*************************************************************
;* Time *
;*************************************************************
Timeserver=, Timeformat=”12-hour format” Dateformat=mm/dd/yyyy
TimeZone='GMT – 07:00' ManualOverride=yes Daylight=yes Start=030207 End=110107 TimeZoneName=”Mountain Standard Time” DayLightName=”Mountain Daylight Time”
;*************************************************************
;* Network *
;*************************************************************
SignOn=Yes
DisableDomain=yes
DomainList=””
;*************************************************************
;* Wireless / 802.1x *
;*************************************************************
IEEE8021X=yes network=wireless access=WPA2-ENT eap=yes eaptype=EAP-PEAP peapeap=EAP-MSCHAPV2 peapmschapdm=bor peapmschaphidedm=yes peapsinglesignon=yes
Device=Wireless Mode=AdHoc SSID=
I can open a web browser and go to the web site of the wyse configs and open them, so I know that the MIME extensions are working.
Ideas?