
The last couple of days, I have been helping a colleague restore a vCenter server that was also running View Composer. The server, for lack of a better explanation, simply “went nuts.” Random services stopped and wouldn’t start, you could ping it and then you couldn’t, you could be working on it and then the VM would shutdown saying the REDO log is bad, if you browsed the datastore folder it was stored in you would have the impression there were a few snapshots but none were seen in Snapshot Manager….just weird! Naturally, there was not a backup and so we contacted VMware support and though very helpful and determined, after hours of multiple people trying to restore this server to life, we had to call it so around lunchtime today, our vCenter server was declared dead.
I suppose a vCenter server dying isn’t the end of the world, but this server also ran View Composer so how could we most easily restore the connection between vCenter, Composer, and View itself. We followed the steps below (generally speaking as some of these seem like a good idea after the fact) to restore vCenter along with View Composer:
1. Connect the vSphere client to an ESX host and begin building a new Windows VM that will become the new vCenter and while Windows is loading, perform the following:
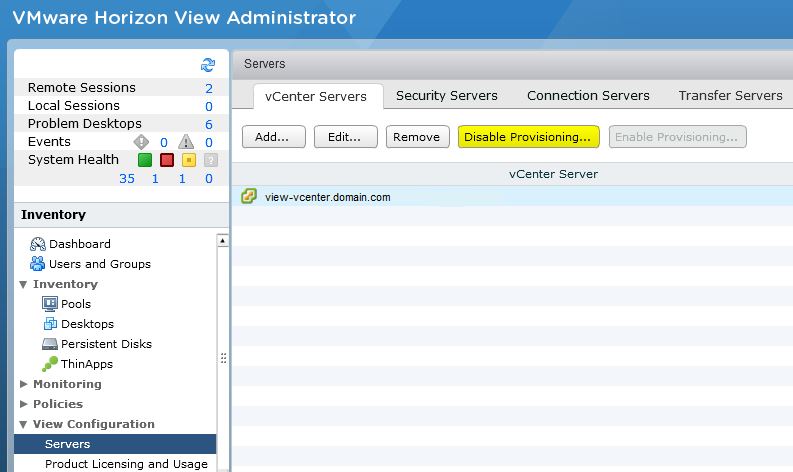
2. Open View Administrator, expand View Configuration and select Servers. On the vCenter Servers tab, click Disable Provisioning.
3. If not already hosed, stop all VMware vCenter services on the existing vCenter server and backup the ADAM Database. vCenter uses an ADAM (Active Directory Application Mode) database to store information related to licensing, custom roles, and Linked Mode configuration.
- Start a command prompt as an administrator
- Run the command dsdbutil
- At the dsdbutil prompt, run the command activate instance VMwareVCMSDS
- Run the command ifm
- To backup the ADAM database, run the command create full <some empty directory>
- In the screenshot below, my first attempt to backup failed because the target directory was not empty.
- After the backup is successful, type quit at the ifm and dsdbutil prompts

4. If necessary, backup the vCenter and View Composer databases. In our case, SQL Server was running on the existing vCenter server so we used SQL Management Studio to backup the vCenter and View Composer databases. **Notate the database names, use the same names on the new vCenter server.
5. Finally, we copied the ADAM, vCenter, and View Composer database backups to a network location and shutdown the existing vCenter server.
ON NEW VCENTER SERVER
Just as an FYI, we made sure to install the same versions of SQL, vCenter, and View Composer so check your versions and make sure you have what you need for installation.
6. Rename and Re-IP the new vCenter server to match the old reboot. Copy down the ADAM, vCenter, and View Composer backup files.
7. Install SQL, create new databases for vCenter and View Composer (again, matching the old name), and then restore vCenter and View Composer using the backup taken in step #4.
8. Configure the Data Source (ODBC) System DSNs for vCenter and View Composer.
9. Install vCenter Server
10. Restore the ADAM database: (may be a good idea to take a snapshot of the vCenter server here)
- Stop the following services in the order listed
- VMware VirtualCenter Management Webservices
- VMware VirtualCenter Server
- VMwareVCMSDS
- Backup the existing ADAM files in the %ProgramData%\VMware\VMware VirtualCenter\VMwareVCMSDS directory by simply copying them to an alternate location
- Run the following command to copy the ADAM backup to the VMwareVCMSDS directory
- xcopy /os backup_location\adamntds.dit “%ProgramData%\VMware\VMware VirtualCenter\VMwareVCMSDS”
- the backup location is the folder path in which the adamntds.dit was copied in #6, an example is shown below
- xcopy /os C:\Backup\VMwareVCMSDS\adamntds.dit “c:\Program Files\VMware\Infrastructure\VirtualCenter Server\VMwareVCMSDS”
- Start the following services in the order listed
- VMware VirtualCenter Server
- VMwareVCMSDS
- VMware VirtualCenter Management Webservices
11. Install View Composer and reboot the vCenter server.
12. When the reboot completes, launch the vSphere client and reconnect to your vSphere servers.
13. Open View Administrator and on the Dashboard page, under the System Health heading, you should have red boxes for vCenter Servers and View Composer because the certificates for each are untrusted and need to be verified.
- Expand vCenter Servers
- click the vCenter hyperlink (https://vcenterFQDN_or_IP:443)
- When the vCenter Server Details page appears, click Verify and then OK

14. Repeat step #13 for View Composer and both should now display green boxes.
15. Finally, test Composer by recomposing existing virtual machines or provision new ones. Assuming the operations are successful, you have successfully restored the vCenter server and View Composer services.
