
In Part 1 of this series, I looked at the steps required to create a blank database which will be mirrored and used to support, in my case, a XenApp 7.6 environment. In this post, that discussion continues and we’ll look at the next step in the mirroring process, backing up the database on the principal server and restoring on the mirror.
On the Principal SQL Server
Perform the following steps on the principal SQL server:
1. Open SQL Management Studio and expand Databases. Right-click the Citrix database and select Tasks | Back Up
2. On the Back Up Database screen, set the Backup type to Full and then set the Destination. Here, I simply backed up the database (with a .bak extension) to the SQLBackup directory I had previously created on the local disk. Click OK to start the backup; it should not take more than a few seconds to complete.

3. Click OK when the backup completes successfully.

4. A second backup of the Citrix database is required to backup the transaction logs. Thus, right-click the Citrix database once again and select Tasks | Back Up
5. On the Back Up Database screen, set the Backup type to Transaction Log and then set the Destination. **When specifying the file name, be sure to use the .trn extension. Click OK to start the backup; it should not take more than a few seconds to complete.

6. Copy the .bak and .trn backup files from the principal to the mirror server.

On the Mirror SQL Server
1. On what will be the mirror SQL server, open SQL Management Studio, right-click Databases and select Restore Database.

2. On the General tab, under Source, select Device and browse for the backup files that were copied to the mirror server.

3. The information concerning the backup file is displayed as shown below….DO NOT CLICK OK, click Options.

4. Set the Recovery state to RESTORE WITH NORECOVERY and then click OK to perform the restore.

5. Click OK when prompted that the database has been restored.
Next, you’re to restore the transaction logs using the same process, however let me share my:
Restoring Transaction Logs Story
Yes, by all accounts you should be able to restore your transaction logs using the same process as restoring the database itself, but that wasn’t the case for me and it looks like it may be a SQL 2012 “bug”….anybody can correct me if I’m wrong in saying that.
When I attempted to restore using the same steps as above while selecting my .TRN backup, I received an error in SQL stating Unable to create restore plan due to break in the LSN chain. Awesome!

A quick search revealed that I was not the only one to have this problem. Several posts commented that though the Restore Database method would fail, the following methods were successful:
- restore via SQL Query/command-line
- restore using “Restore Files and Filegroups” option
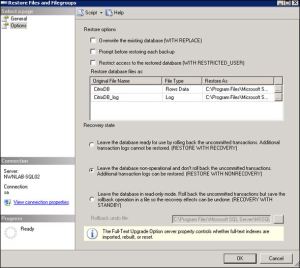
6. To restore the transaction logs, right-click Databases and select Restore Files and Filegroups

7. The process from this point is basically identical but does look slightly different. As before, on the General page, select the transaction log backup (.TRN) as the source Device but DO NOT CLICK OK. Click Options, and select the RESTORE WITH NONRECOVERY option as shown below, then click OK.

8. When prompted that the database has been restored, click OK.
This completes the steps required to backup the database on the principal server and restore onto the mirror server. In Part 3, we will setup the database mirror.

Thanks for this post. I’m interested in learning more about databases. Is SQL a good place to start?
Other than Microsoft Access?
Hey Kaitlin, if you mean SQL in terms of a programming language that you can use to build new databases, I suppose that’s a good place to start. Personally, I don’t know anything about database construction, I just know how to open SQL Management Studio and do a few things.