When installing Office 2013 on a Citrix XenApp 7.6 server (or any version of Office on any version of XenApp….or any VDI implementation), I use the Office Customization Tool (OCT) to create a custom MSP to tailor the Office installation.
Here are my general overall steps:
- To launch the OCT, open a command prompt, browse to the directory containing the Office setup files and execute the command setup /admin
- Create a new, or select an existing customization file and click OK.
- Under Setup, click Install location and organization name and set the Installation Path and the Organization Name
- Click License and user interface, and then specify the following
- KMS or MAK Licensing
- Access the License Agreement
- Set the preferred Display level (personally, I set the display level to Full because I like seeing the installation wizard doing stuff)
- In this example, I am working with a MAK license key and thus I clicked Modify setup properties | Add
- When the Add/Remove Property Value window appears, enter AUTO_ACTIVATE for the Name with a Value of 1 and click OK.
- Under Features, click Modify User Settings and feel free to go nuts customizing Office 2013. The settings below represent my baseline configuration settings
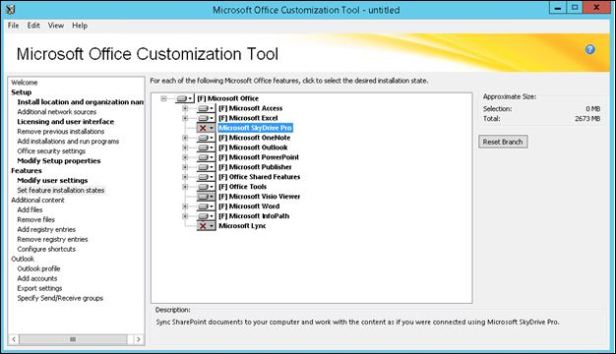
- Once your preferred options are set, click Features | Set feature installation states and configure the installation states of the various Office applications
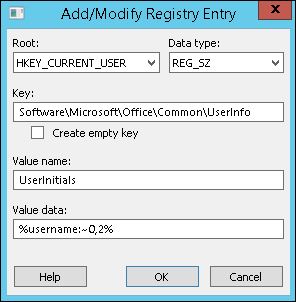
- Another thing I like to do is create registry values that will “auto-populate” user information to give Office a somewhat personal feel for the end user. To do so, click Add registry entries under the Additional content heading. Click Add and then create the two registry keys shown below:
- Assuming there are no additional modifications needed, click File | Save As, specify a name, and then click Save. Typically clients have their Office installation files on an IT or Installs share, I usually save my MSPs to that directory.
- To install Office using the MSP file, do the following on the XenApp server:
- open a command prompt as administrator
- type change user /install and press <ENTER> (yes, I still do it but you can do what you want)
- browse to the directory containing the Office setup files and type setup /adminfile <MSPFileName>.MSP and press <ENTER>. If the MSP file resides in a directory other than the installation files, you’ll need to specify the path.
- when the install completes, download and install the latest Office service pack
- once all required updates are installed, type change user /execute and press <ENTER> to complete the installation
- Use Citrix Studio to create any relevant Machine/Delivery Groups and publish the Office applications.
- Test Office functionality and activation