
Let me start with a few facts to set the stage:
1. Our Systems team recently built a 2008 Server Core Hyper-V Failover Cluster with SCVMM.
2. Our team manager wanted XenDesktop installed into the Hyper-V environment.
3. A couple months ago, Citrix published the Citrix XenDesktop 2.1 with Hyper-V and System Center Virtual Machine Manager 2008 Evaluation Guide.
The guide basically breaks the installation process into 9 tasks. Everything was going fine until Task 8: step 24, mapping the vDisk to the base desktop image. In the document, most of the VM management tasks are done using Hyper-V Manager. I had made the assumption that the tasks could be performed in SCVMM just as well, bad assumption on my part.
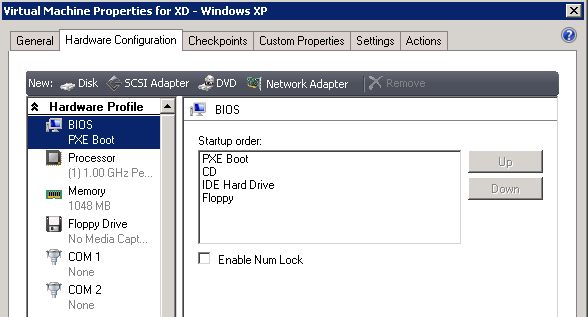
Task 8 is Preparing and Provisioning Virtual Desktops. You begin by launching Hyper-V Manager to set the “Legacy Network Adapter” to the top of the Startup Order. As you can see below, in SCVMM there is no Legacy Network Adapter, only PXE Boot. I had thought that would be sufficient.
However, after installing the Citrix Provisioning Server Target Device and rebooting the base desktop VM, the vDisk would not map, status inactive.
To make a long story short, I performed the following steps to get the vDisk to map to the base desktop VM:
1. Open the Provisioning Server Console and expand the Farm | Sites | XDLab | Device Collections. Select Collection and then right-click the VM in the right-hand pane and choose Delete.

2. Shutdown down the base desktop VM and launch Hyper-V Manager, not SCVMM!! Right-click the VM and choose Settings. Click Add New Hardware and choose Legacy Network Adapter. I personally removed my first network adapter after adding the Legacy Network Adapter.
Click BIOS and move Legacy Network Adapter to the top of the Startup Order.

3. Once the base desktop VM reboots; login, launch a command prompt, and type ipconfig /all. Make a note of the new MAC address.
4. On the base desktop VM, remove the Provisioning Server Target Device application.
5. In the Provisioning Server Console, once again expand the Farm | Sites | XDLab | Device Collections. Right-click Collection and choose Create Device. For Boot From, choose Hard Disk and enter the new MAC address.

6. Click the vDisk tab. Under vDisks for this device, click Add and specify the vDisk to be used for the base desktop VM. Click OK.

7. Reinstall the Provisioning Server Target Device application on the base desktop VM. You may need a reboot, but the vDisk status will change to Active and you can proceed to the Provisioning Server Image Builder.

thanks alot. wasted a day before i got to this post.
Great, I'm glad it helped
Thank You!! I'm happy to read this solution!